Mississippi Egg Marketing Board Tips for Easter
Genuine MS® member, the Mississippi Egg Marketing Board, was established to expand the market for Mississippi-produced eggs. The Egg Marketing Board’s mission is to educate the consumer as to the food value of eggs; disseminate information relating to eggs and the importance of eggs in preserving public health; demonstrate the economic value of eggs; and stress the importance of eggs in the nutrition of children. The Egg Marketing Board participates in many statewide events to promote its mission and provides “Egg”ucational materials to educators and home-school groups. They have two upcoming events at the Mississippi Agriculture and Forestry Museum in Jackson, MS. Learn more: https://www.msagmuseum.org/events/.


This Easter, the MS Egg Marketing Board shares their favorite DIYs, recipes and tips using eggs for a hopping good time.
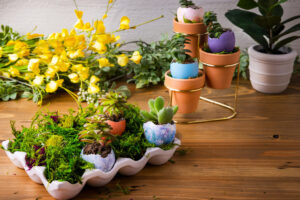
1) Succulent Egg
The first project is for our plant lovers who enjoy incorporating greenery into every occasion.
Supplies:
- A pin
- A thicker needle used for sewing with yarn
- Small hammer
- Succulent and soil
- Nail Polish
- Room temperature water in a cup
- Skewer
Directions:
- Pour several drops of nail polish colors into cup of room temp water
- Use skewer to mix colors into marble effect
- Dip egg into water
- Once dry, put pin on top of egg and tap in with hammer
- Put yarn needle into hole created by pin and tap with hammer…use this to chip away at egg and drain yolk.
- Create large enough hole to plant succulent in
- Once egg is dry, plant succulent into egg
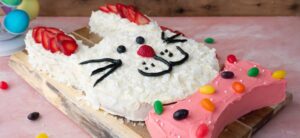
2) Bunny Cake
This activity is great for kids or even a date!
Ingredients:
- 4 large eggs
- 1/2 cup butter, softened to room temperature
- 1/2 cup canola oil
- 1 1/2 cups granulated sugar
- 1 Tbsp. vanilla extract
- 3 cups all-purpose flour
- 1 Tbsp. baking powder
- 1/2 tsp. salt
- 1 1/4 cups buttermilk
- 3 cups unsalted butter, softened to room temperature
- 9 cups powdered sugar, sifted
- 10 Tbsp. heavy cream or milk
- 2 Tbsp. vanilla extract
- 2 pinches fine table salt
- 4 cups sweetened coconut flakes
- 7 strawberries, green tops cut off
- 2 blueberries
- Small tube or pen black gel frosting
- 1 drop red food coloring
- 1 Tbsp. edible pearls and jelly beans (or other fun sprinkles)
Directions:
- PREHEAT oven to 350° F. SPRAY 2 9-inch cake pans with nonstick cooking spray. SET aside.
- COMBINE butter, canola oil and sugar in a bowl of a stand mixer. MIX until well combined and creamy.
- ADD eggs, one at a time. MIX well after each addition. STIR in vanilla extract.
- WHISK together flour, baking powder and salt in a separate medium bowl.
- ADD buttermilk, 1/4 cup at a time, alternating with flour mixture and mixing with large spoon until just combined after each addition. Do not over mix.
- DIVIDE batter into prepared cake pans. BAKE for 30-35 minutes or until a toothpick inserted in the center comes out clean.
- COOL cakes in pans for 10-15 minutes before inverting on a large tray to cool completely before frosting.
- To make buttercream frosting, MIX unsalted butter, powdered sugar, heavy cream, vanilla extract and fine table salt; use a whip attachment, starting slowly and gradually increasing the speed until light and fluffy. ADD more cream or powdered sugar as needed to get the desired consistency.
- PLACE one whole 9-inch cake layer on large serving tray, forming the bunny’s head. CUT 2 convex shaped ears from each side of the second layer. PLACE on each side of head to form ears. PLACE concave shaped piece below head for bowtie.
- FROST bunny head and ears with white frosting, covering top and sides. PAT coconut flakes evenly over top and sides.
- SLICE one strawberry in half lengthwise. USE one half for bunny nose and place in the center of the bunny head pointy side down. ARRANGE blueberries to form eyes.
- SLICE remaining strawberries lengthwise, cutting 3-4 slices from each strawberry. ARRANGE strawberry slices on ears; cut parts facing up to detail the ears.
- DRAW mouth and whiskers with black gel frosting tube or pen.
- ADD red food coloring drop to remaining white frosting. STIR until frosting evenly turns pink. FROST bowtie. DECORATE with edible pearls and jelly beans.
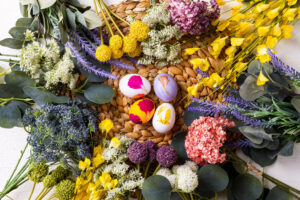
3) Pressed Flower Easter Eggs
This project is the elevated version of the classic dyed eggs utilizing your favorite dried flowers.
Supplies:
- Hard-boiled brown and white eggs
- Modge Podge
- Pressed flowers
- Paint brush
- Egg dye (optional, if you want to start with a colored egg)
Directions:
- If you’d like, dye your egg(s) the color of your choice and allow to dry. If natural egg color is preferred, skip this step, and start with step 2
- Paint your egg with Modge Podge
- Apply your dried flowers into the egg, pressing the flower down so that it adheres to the egg
- Allow the egg and flowers to dry
- Add another layer of Modge Podge to coat the egg and seal the flower on
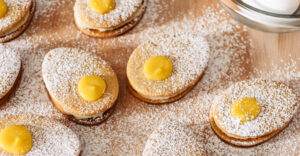
4) Lemon Sandwich Cookies
These cookies are great snacks to accompany any spring tea party.
Cookies
-3 cups all-purpose flour
-1 1/2 tsp baking soda
-1/2 tsp baking powder
-3/4 tsp kosher salt
-3/4 cup vegetable shortening
-1/4 cup unsalted butter, softened to room temperature
-1 cup granulated sugar
-2 tbsp whole milk
-2 tsp vanilla extract
-1 egg
- To make the cookies, in a medium bowl whisk together flour, baking soda, and salt.
- In the bowl of a stand mixer fitted with a paddle attachment, cream together shortening and butter until well combined. Scrape down the sides of the bowl, add the sugar and beat on medium speed until pale and fluffy, 3 to 5 minutes.
- Place a rack in the upper third of the oven and preheat oven to 350 degrees F. Roll half of the dough between two lightly floured pieces of parchment paper or on a lightly floured counter to a thick ¼-inch thickness of just under 1/2-inch thickness. Cut with a 2 to 3-inch egg cookie cutter and place on a parchment lined baking sheet. Use a 1-inch round or egg-shaped cookie cutter to cut yolk holes out of half of the egg cookies. This will be our top cookie. Bake for 8 to 10 minutes until just golden around the edges. Allow to cool completely before filling.
Curd
-1/2 cup fresh lemon juice (from about 3 lemons)
-2 tsp finely grated lemon zest
-1/2 cup granulated sugar
-6 tbsp unsalted butter, cut into cubes
-3 large eggs
- To make the lemon curd, whisk together juice, zest, sugar, and eggs in a 2-quart heavy saucepan. Stir in butter and cook over moderately low heat, whisking frequently, until curd is thick enough to hold marks of whisk and first bubble appears on surface, about 6 minutes. Transfer lemon curd to a bowl and chill, its surface covered with plastic wrap, until cold, at least 1 hour. The curd will thicken as it cools.
Buttercream
-1 cup unsalted butter, softened to room temperature
-2 cups powdered sugar
-1 tsp finely grated lemon zest
-1-2 tbsp milk, warm
-1 tsp poppy seeds
-Pinch of salt
- To make the buttercream, in a medium bowl with an electric hand mixer, beat butter until well softened around the bowl. Add powdered sugar, salt, and lemon zest and beat on low speed. Add the warm milk and whip to combine. Beat in poppy seeds. Transfer frosting to a freezer ziplock bag with the corner tip cut off or a piping bag with a medium round tip. Leave buttercream at room temperature until ready to pipe.
To assemble
- To assemble the cookies, flip each whole egg cookie so the bottom is facing up. Pipe buttercream frosting around the edge. Spoon 2-3 teaspoons of lemon curd into the center of the cookie. Top with a cookie with a hole, press gently to sandwich and spoon a teaspoon of lemon curd into the cookie hole. Store in the refrigerator and dust with powdered sugar before serving. Cookies will last up to 3 days in the refrigerator.
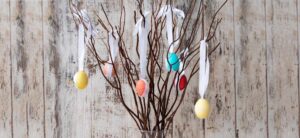
5) Kid Friendly Easter Tree Decoration
Get the kids involved for this simple DIY project.
Supplies:
- 12 empty eggshells, decorated
- 12 strips of ribbon, 15” each and ¼ – ½” wide
- Scissors
- Craft glue or hot glue gun
- Small to medium size sturdy tree branches
- Container for branches (vase or large Mason jar)
- Floral clay/foam or styrofoam (optional)
- Gravel, pebbles or marbles
- Bowl
Directions:
- DRY empty decorated eggshells completely.
- CUT 12 15” strips of ribbon. WRAP and GLUE a piece of ribbon around each egg. Starting at the smaller end of the egg, GLUE in a straight line down the egg around the larger end and COMPLETE back at the smaller end where you started, allowing 5” of the ribbon at the ends to TIE a bow at the top of the egg. This will become the loop to attach each egg to the tree branch. PLACE ribboned eggs to the side. LET the glue dry.
- REMOVE any leaves from the tree branch. PLACE a piece of floral clay on the bottom of the container and PLACE the branches in the clay to tightly secure.
- ADD gravel, pebbles or marbles to cover the floral clay.
- HANG the decorated eggs on branches to complete the Easter Tree!
**Credit: all projects and recipes are sourced from the Incredible Egg. The Incredible Egg is the website for the American Egg Board which was created by an Act of Congress in 1976 at the request of America’s egg farmers, who desired to pool resources for national category-level egg marketing. Their mission is to support America’s egg farmers and increase demand for eggs and egg products.**