How To Garden Without Land

In a world that has become increasingly more uncertain and divided, people are turning to hobbies from simpler times. These hobbies, such as canning or sewing, are things that would have been taught in a Home and Economics class or learned from family members when households were more self-sufficient. These skills along with farming/gardening formed the foundation of families in the early 1900s but declined gradually as technology and other opportunities for work developed.
Gardening had a resurgence during the COVID-19 pandemic, which saw 18.3 million people take up gardening as a way to pass the time and stay productive while at home. Today, people look for a way to take back control of their lives by fostering hobbies away from the screens that fill every aspect of modern times. So, they also turn to gardening.
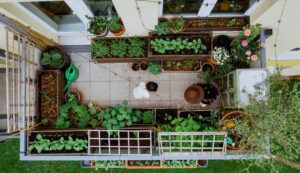
Unfortunately, it is hard to come by a reasonably priced plot of land, so patio gardens and container gardening find themselves at the forefront of this movement. If you find yourself falling down the rabbit hole of where to begin your garden and lack land, then keep reading!
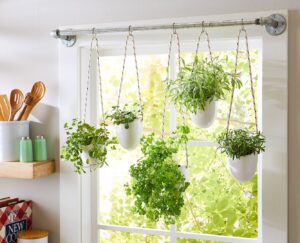
Step 1: Determine your plant’s location
Look around your apartment or house for well-lit areas.
If you are looking to garden indoor — ideal spots are areas near windows or are where you have space to include grow lights. It is important for your plants to receive ample light to thrive. A grow light is an electric light to help plants grow. Grow lights either attempt to provide a light spectrum similar to that of the sun, or to provide a spectrum that is more tailored to the needs of the plants being cultivated.
If you are looking to garden outdoor — consider your location’s climate. If you live in Mississippi, plants that are “direct sun” may still struggle due to the high temperatures that are prominent in the summer. Once you’ve taken in account the lighting needs, consider its watering needs. If a plant is under a covered space such as a porch it may require less water than one that is uncovered.

Step 2: Select your plants
Now that you know the environment your plants will endure, look for plants that match those conditions. For example, if your patio is mostly shaded or balcony only receives a couple hours of sun, you don’t want to buy full sun plants such as peppers, tomatoes, or strawberries since they require 6 hours of unfiltered sunlight. These plants may survive but will not produce as well if in the wrong conditions. Instead, search for “partial sun” or “partial shade” plants that need 3-6 hours of direct sun per day such as herbs, cilantro, garlic, or potatoes.
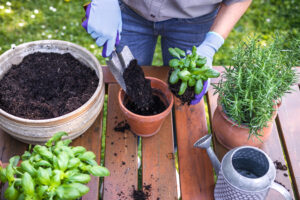
Step 3: Pot your plants
Containers must be large enough to contain the plant’s root system and keep the plant itself upright. A good rule of thumb is to choose a container that’s at least one-third as tall as the final height of the plant listed on the plant tag or seed packet. For example, if a type of basil grows to 18 inches, the pot should be at least 6 inches high. For plants that grow very large, like lemongrass, bigger is definitely better. Regardless of size, every pot needs drainage holes to allow excess water to drain away from roots.
Additionally all plants need well-draining soil, or they will develop root rot — a disease that attacks the roots of trees growing in wet or damp soil. Look for a potting mix designed for containers. A local garden or home center carries numerous brands and types of potting soil. These soils contain ingredients designed to enhance aeration, drainage, and moisture retention.
Good potting soil typically contains:
- Sphagnum Peat Moss: It helps hold water moisture and improves aeration.
- Perlite and Vermiculite: They add air space to the soil for better root health. They’re also essential for improving drainage in your gardening containers.
- Compost: It provides organic material for your plants containing essential nutrients.
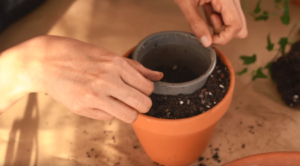
Pro tip: when transferring your plant from its nursery pot to the bigger pot it will grow in, use the nursery pot as a guide for how deep to plant your fruit, vegetable, or herb (see above image). Be sure to loosen the roots once it is removed from the nursery pot carefully with your fingers or a small stick such as a knitting needle or chopstick. Plant it into the empty space, cover it with soil and lightly tap the sides of the pot to ensure there are no air pockets.

Step 4: Water your plants
Once you’ve potted your plant, be sure to soak the soil all the way through so that water is running out the drainage holes at the bottom. Once root systems are established you can bottom water plants all at once by placing them in a container such as a kiddie pool or large bowl and allowing the plant the time to soak up the water it needs. Remove the plant once the soil is damp feeling to the touch or wait ~15-30 minutes. Some plants — like tomatoes — don’t like their leaves wet so this is a great method for ensuring they get the water they need without disrupting any plant processes. However, every now and then you will still want to water plants from the top to wash out any impurities that may be in the soil.
Step 5: Enjoy
After watering and fertilizing (if needed) your plant consistently, you will be able to enjoy the fruits of your bounty. You will receive satisfaction knowing you nurtured something to grow and put in the hard work to put it on your plate.
For more information about gardening, read Mississippi State University Extension’s Mississippi Vegetable Gardener’s Guide.